

Capital One offers both credit cards (Venture, Quicksilver, Savor, and others) and Capital One 360 online banking, including checking and savings accounts. Both product lines let you download transaction history as a CSV file directly from your account, which you can open in Google Sheets and Excel.
This guide covers the full export process step by step for both Capital One credit cards and Capital One 360 bank accounts. If you’re managing Capital One alongside accounts at other institutions or you want your data to stay current without repeated manual downloads, the end of this guide covers how to connect Capital One to a spreadsheet automatically so new transactions arrive daily without any manual effort.
How to export Capital One credit card transactions as a CSV
Step 1: Log in to your Capital One account
Go to capitalone.com and sign in to your account.
Step 2: Select your credit card
From the account overview, click on the Capital One credit card account you want to export.
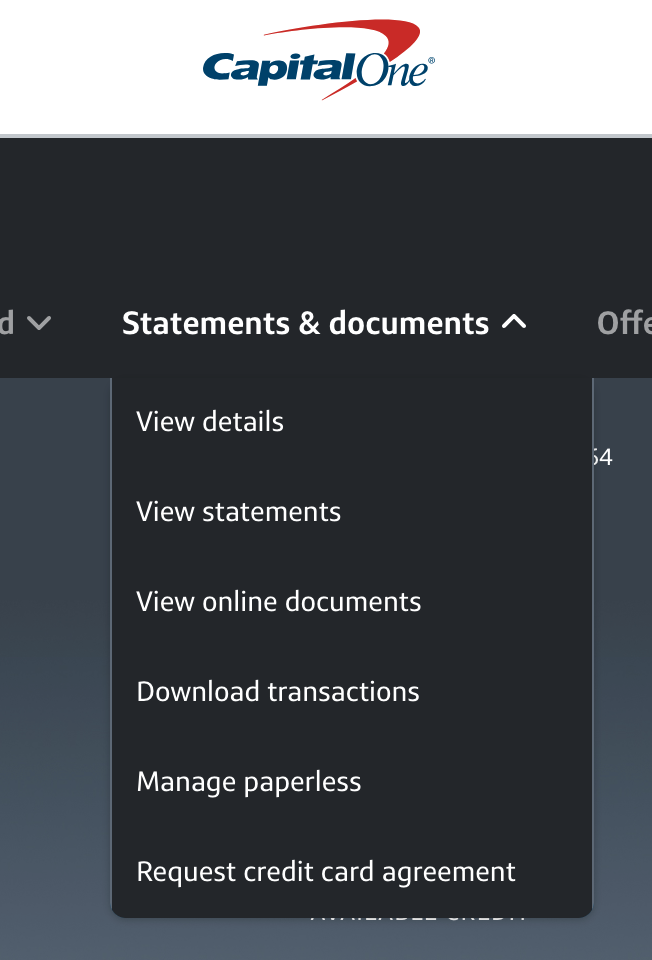
Step 3: Click the Statements and documents
Hover over the “Statements & documents” menu and click “Download transaction.”
Step
4: Choose your date range and file format
- Choose CSV as the file format for best compatibility with Google Sheets and Excel.
- Capital One may also offer OFX and QFX options; these are designed for Quicken and aren’t ideal for direct spreadsheet import.
- Set a date range for the transactions you want.
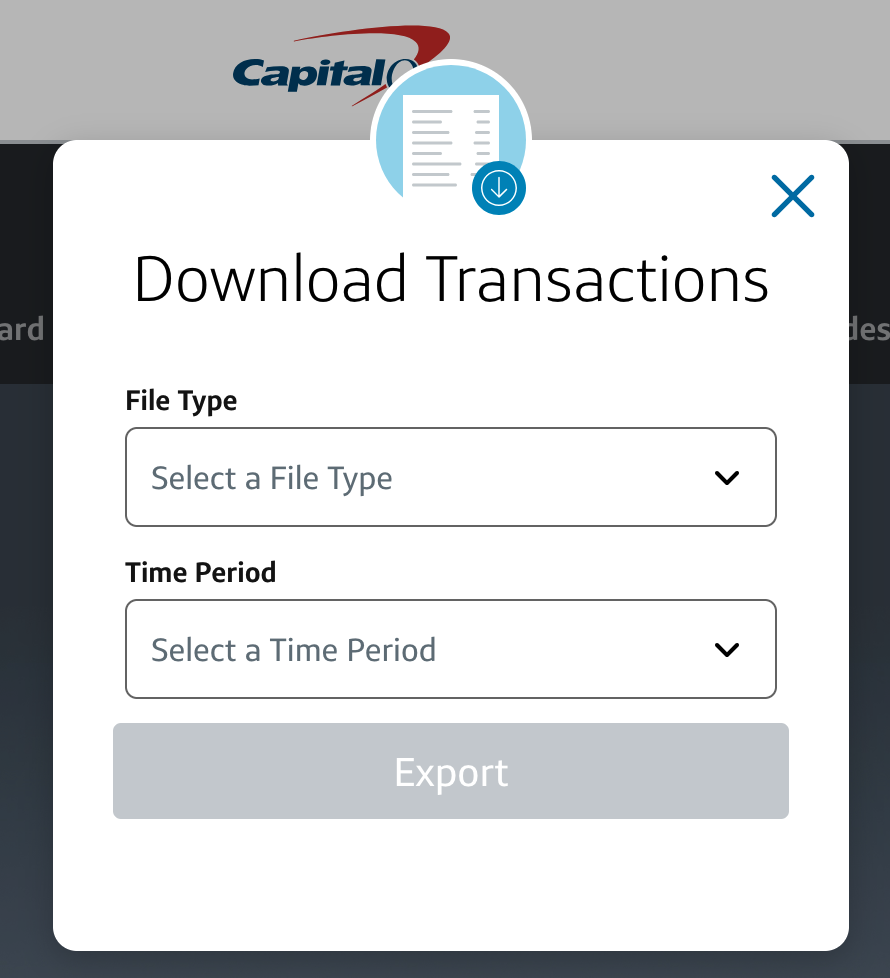
Step 5: Download the file
Click Export and save the CSV file to your computer.
How to export Capital One 360 bank account transactions as a CSV
The process for Capital One 360 checking and savings accounts follows a similar pattern but starts from a different section of the account portal.
Step 1
Log in at capitalone.com and navigate to your Capital One 360 checking or savings account.
Step 2
Click on your account to open the transaction history view.
Step 3
Look for a Download or Export Transactions option near the top of the transaction list.
Step 4
Select your date range and choose CSV as the file format.
Step 5
Download the file and save it to your computer.
How to open your Capital One CSV in Google Sheets
- Go to sheets.new to open a new Google Sheet, or go to the home page for your Google Drive or Sheets account.
- Click File → Open → Upload.
- Drag and drop your downloaded CSV file or click Browse to locate it.
- Google Sheets will import the file and display your Capital One transactions.
How to open your Capital One CSV in Microsoft Excel
- Open Excel and click File → Open.
- Browse to your downloaded CSV file and open it.
- If the Text Import Wizard appears, select Delimited, click Next, check Comma, and click Finish.
- Your Capital One transactions will appear in columns ready to work with.
For Excel Online, go to excel.cloud.microsoft, click Upload a File, and select your CSV.
Capital One’s credit card CSV typically includes columns for Transaction Date, Posted Date, Card No., Description, Category, Debit, and Credit. Like several other major banks, Capital One uses separate Debit and Credit columns rather than a single signed Amount column. To consolidate them, add a new Amount column with a formula like
=IF(F2<>““, -F2, G2)
This formula assumes Debits are in column F and Credits in column G; if your columns are different, adjust the formula accordingly.
Capital One includes a Category column in their CSV export, which is their own pre-assigned spending categories for each transaction. This can serve as a useful starting point for your own category setup, or it can help you build AutoCat rules faster if you use Tiller.
Limitations of manual Capital One exports
As with any CSV file, there are limitations for working with these files:
- Separate exports per account: Each Capital One credit card and each 360 bank account requires its own individual download, so if you have multiple Capital One cards, that’s multiple separate exports every time.
- Split Debit/Credit columns: Capital One’s CSV uses separate Debit and Credit columns rather than a single signed Amount column, so a cleanup step is required before the data works well with standard budget formulas.
- No scheduling: Capital One doesn’t offer automated or scheduled exports. You repeat the full process manually every time you want to update the data.
- Card number included: Capital One’s CSV includes a Card No. column showing the last four digits of your card. This is useful for identifying which card each transaction came from, but it is an extra column to manage if you’re consolidating multiple exports.
- Pending transactions: Pending credit card charges don’t appear in exports until they post.
Automate Capital One transaction tracking with Tiller
If you’re tracking multiple Capital One cards alongside other financial accounts or just want your spreadsheet to always reflect current data, Tiller removes the export process entirely.
Tiller connects your Capital One credit cards and Capital One 360 bank accounts directly to Google Sheets or Excel and automatically imports daily transactions into the Foundation Template or a template you set up. All your Capital One activity appears pre-formatted in your spreadsheet, alongside activity from any other connected institutions.
Capital One’s pre-categorization in their CSV export can inform your AutoCat rules in Tiller. If Capital One calls a merchant “Dining,” you can create a matching AutoCat rule to tag it as your preferred category — Dining Out, Restaurants, or whatever fits your budget structure — automatically on every new transaction.
Frequently asked questions
Q: Can I export all my Capital One credit cards at once?
No. Capital One requires a separate download for each card. If you have a Venture card and a Quicksilver card plus a Capital One 360 checking account, that’s three separate exports to run and combine. Tiller connects all Capital One accounts simultaneously and consolidates everything into one spreadsheet automatically.
Q: Why does Capital One’s CSV have separate Debit and Credit columns?
Capital One formats their CSV with separate columns for money going out (Debit) and money coming in (Credit) rather than a single signed Amount column. Most budget spreadsheet formulas expect a single Amount column with negative values for expenses and positive values for income. To consolidate, add a new column with the formula =IF(F2<>"", -F2, G2) if Debits are in column F and Credits in column G. Tiller handles this formatting automatically.
Q: Capital One already categorizes my transactions. Can I use that in my spreadsheet?
Yes. Capital One’s CSV includes a Category column with their pre-assigned spending categories. You can use these as a starting point in your spreadsheet, or use them to build AutoCat rules in Tiller that apply your own preferred category labels automatically to matching transactions going forward.
Q: How far back can I export Capital One transaction history?
Capital One credit card accounts typically allow exports going back several years. Capital One 360 bank account export windows may vary. Check your current Capital One online banking interface for the exact date-range limits on your specific account.
Q: What file format should I choose when downloading Capital One transactions?
Choose CSV for Google Sheets or Excel. Capital One may also offer OFX or QFX formats, but these are designed for Quicken and aren’t the right choice for direct spreadsheet import.
Q: Can Tiller automatically import Capital One transactions into my spreadsheet?
Yes. Tiller supports Capital One credit card and Capital One 360 bank account connections. It delivers transactions daily into Google Sheets or Excel alongside your other financial accounts with consistent formatting that eliminates the split Debit/Credit column issue entirely.
Q: Does the Card No. column in Capital One’s CSV cause any problems?
No. In fact, it’s useful if you’re combining exports from multiple Capital One cards into one transaction sheet, since the last four digits help you identify which card each transaction came from. Just be aware that it’s an extra column to manage or delete if you don’t need it. Tiller includes an Account column that handles this automatically.